
June 6, 2021
DAO1 has produced three guides for people that might not be so knowledgeable on how to use Decentralized Exchanges.
This guide will be the second of three, namely, how to buy DAO1 tokens on SafeSwap.
Requirements:
- Hardware: A Smartphone or a Laptop with Internet Access.
- Access to USDT and Ethereum, for example on a Centralized Exchange such as Binance.
(We find that the easiest way to get USDT and ETH is through Binance, where one can simply deposit money through a credit/debit card/bank account and buy USDT and a little Ethereum for fees almost instantly)
We will be buying DAO1 tokens with USDT on SafeSwap in this guide:
Relevant links and contracts:
Binance: https://www.binance.com/en
Metamask: https://metamask.io/
SafeSwap: https://safeswap.yfdai.finance/#/
DAO1 Contract Address: 0xce3f6f6672616c39d8b6858f8dac9902eca42c84
First, we need to setup a MetaMask Wallet:
Step 1: Get MetaMask Wallet either as a browser extension on your laptop (we prefer the browser Brave) or download it as an app to your smartphone at: https://metamask.io/ or the relevant App Store. (It’s free).
Set it up and write the seed phrase down on a piece of paper for recovery, in case you lose your device.
Step 2: Copy the MetaMask Address of your Metamask Wallet
Step 3: Send USDT and a little ETH for fees via the ERC20 Network to the address from your wallet on an exchange such as Binance, or wherever you hold USDT and ETH.
On Binance, go to Wallet, then click Withdraw, and search for USDT. Then click withdraw, paste the Metamask Wallet Address, and select the ERC20 Network, and confirm the Withdrawal.
Then do the same for ETH (about 0.005–0.01 ETH).

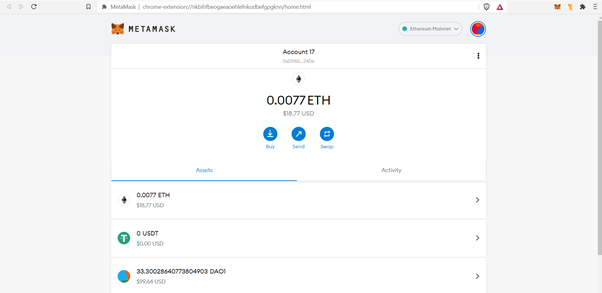
This image shows the Metamask Wallet in the Brave Browser, where one can hold the cursor and copy the Metamask address to where one is sending USDT and ETH from via the ERC20 network.
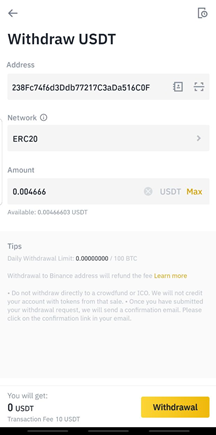
This image shows the Withdrawal Process from Binance, where one pastes the MetaMask address in the Address field, selects the ERC20 Network, and finally chooses the amount of USDT or ETH one wants to send. It will take between 3–15 minutes to send the USDT and ETH, all depending on the Ethereum Networks congestion. After sending the USDT, do the same for ETH.

Once we have USDT and Ethereum (ETH) on our Metamask wallet, we can proceed to buy DAO1 tokens on SafeSwap:
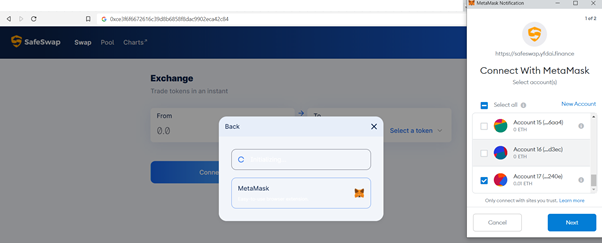
Step 4: go to SafeSwap, ( https://safeswap.yfdai.finance/#/swap ) and click connect Wallet, Metamask, next, then connect.
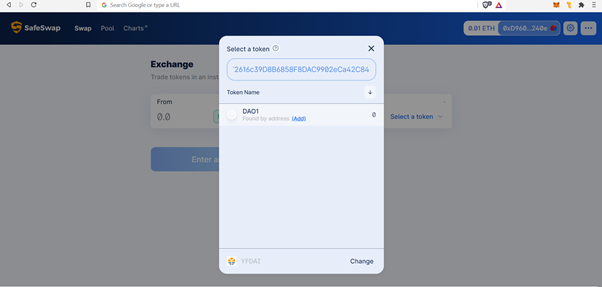
In “from” it should automatically be ETH, set it to USDT.
If it does not pop up, copy paste the contract address for USDT in “from”, and it will pop up:
USDT Contract address: 0xdac17f958d2ee523a2206206994597c13d831ec7

Step 5: Copy the DAO1 Token Address: 0xce3f6f6672616c39d8b6858f8dac9902eca42c84 and paste it into “to”. (click “select a token”, then you can paste it). You will see DAO1 popping up, click “add”.
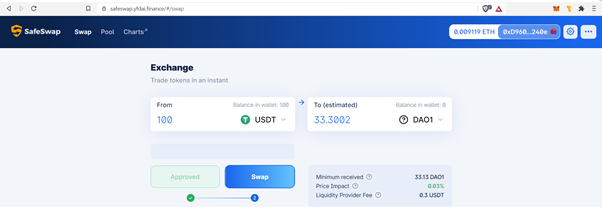
Step 6: Set the amount of USDT you want to spend for DAO1 tokens, and you will see the amount of DAO1 token you will get.


Step 8: Wait a little until the approval is complete.
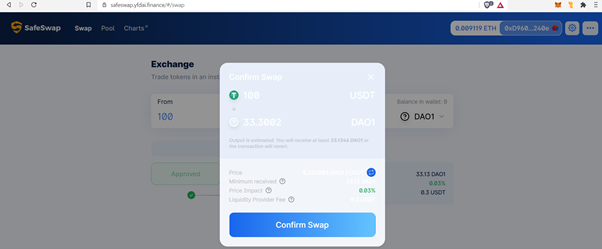
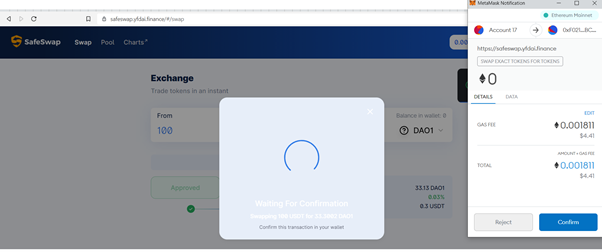
Step 9: Once approved, click “Swap”, then click “confirm swap”, and confirm the Transaction and ETH transaction fees associated inside Metamask.
tep 10: Wait a little, it can take anywhere between 10 seconds-5 minutes to confirm the transaction. You can track the transaction inside your Metamask Wallet by going to Transaction history.
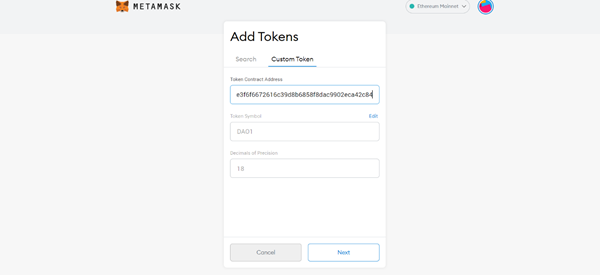
Step 11: Now copy the DAO1 token address again and go back to your MetaMask account.
Step 12: Click “Add Token” then “Custom Token” and paste the token address.
Step 13: Congratulations, you should now see your DAO1 tokens 😊
Learn more about DAO1 at: https://dao1.org/
Follow us on: Twitter | Reddit | Discord | LinkedIn
Join the DAO1 Community on Telegram: https://t.me/dao1globalchat
DAO1 Announcements on Telegram: https://t.me/dao1announcements